# 1. 前言
到现在,模板编译的三大阶段就已经全部介绍完毕了,接下来本篇文章,就以宏观角度回顾并梳理一下模板编译整个流程是怎样的。
首先,我们需要搞清楚模板编译的最终目的是什么,它的最终目的就是:把用户所写的模板转化成供Vue实例在挂载时可调用的render函数。或者你可以这样简单的理解为:模板编译就是一台机器,给它输入模板字符串,它就输出对应的render函数。
我们把模板编译的最终目的只要牢记在心以后,那么模板编译中间的所有的变化都是在为达到这个目的而努力。
接下来我们就以宏观角度来梳理一下模板编译的整个流程。
# 2. 整体流程
上文说了,模板编译就是把模板转化成供Vue实例在挂载时可调用的render函数。那么我们就从Vue实例挂载时入手,一步一步从后往前推。我们知道,Vue实例在挂载时会调用全局实例方法——$mount方法(关于该方法后面会详细介绍)。那么我们就先看一下$mount方法,如下:
Vue.prototype.$mount = function(el) {
  const options = this.$options;
  // 如果用户没有手写render函数
  if (!options.render) {
    // 获取模板,先尝试获取内部模板,如果获取不到则获取外部模板
    let template = options.template;
    if (template) {
    } else {
      template = getOuterHTML(el);
    }
    const { render, staticRenderFns } = compileToFunctions(
      template,
      {
        shouldDecodeNewlines,
        shouldDecodeNewlinesForHref,
        delimiters: options.delimiters,
        comments: options.comments
      },
      this
    );
    options.render = render;
    options.staticRenderFns = staticRenderFns;
  }
};
2
3
4
5
6
7
8
9
10
11
12
13
14
15
16
17
18
19
20
21
22
23
24
从上述代码中可以看到,首先从Vue实例的属性选项中获取render选项,如果没有获取到,说明用户没有手写render函数,那么此时,就像上一篇文章中说的,需要Vue自己将模板转化成render函数。接着获取模板,先尝试获取内部模板,如果获取不到则获取外部模板。最后,调用compileToFunctions函数将模板转化成render函数,再将render函数赋值给options.render。
显然,上面代码中的核心部分是调用compileToFunctions函数生成render函数的部分,如下:
const { render, staticRenderFns } = compileToFunctions(
  template,
  {
    shouldDecodeNewlines,
    shouldDecodeNewlinesForHref,
    delimiters: options.delimiters,
    comments: options.comments
  },
  this
);
2
3
4
5
6
7
8
9
10
将模板template传给compileToFunctions函数就可以得到render函数,那这个compileToFunctions函数是怎么来的呢?
我们通过代码跳转发现compileToFunctions函数的出处如下:
const { compile, compileToFunctions } = createCompiler(baseOptions);
我们发现,compileToFunctions函数是 createCompiler 函数的返回值对象中的其中一个,createCompiler 函数顾名思义他的作用就是创建一个编译器。那么我们再继续往前推,看看createCompiler 函数又是从哪来的。
createCompiler 函数出处位于源码的src/complier/index.js文件中,如下:
export const createCompiler = createCompilerCreator(function baseCompile(
  template: string,
  options: CompilerOptions
): CompiledResult {
  // 模板解析阶段:用正则等方式解析 template 模板中的指令、class、style等数据,形成AST
  const ast = parse(template.trim(), options);
  if (options.optimize !== false) {
    // 优化阶段:遍历AST,找出其中的静态节点,并打上标记;
    optimize(ast, options);
  }
  // 代码生成阶段:将AST转换成渲染函数;
  const code = generate(ast, options);
  return {
    ast,
    render: code.render,
    staticRenderFns: code.staticRenderFns
  };
});
2
3
4
5
6
7
8
9
10
11
12
13
14
15
16
17
18
可以看到,createCompiler函数是又 调用createCompilerCreator 函数返回得到的,createCompilerCreator 函数接收一个baseCompile函数作为参数。我们仔细看这个baseCompile函数,这个函数就是我们所说的模板编译三大阶段的主函数。将这个函数传给createCompilerCreator 函数就可以得到createCompiler函数,那么我们再往前推,看一下createCompilerCreator 函数又是怎么定义的。
createCompilerCreator 函数的定义位于源码的src/complier/create-compiler.js文件中,如下:
export function createCompilerCreator(baseCompile) {
  return function createCompiler(baseOptions) {};
}
2
3
可以看到,调用createCompilerCreator 函数会返回createCompiler函数,同时我们也可以看到createCompiler函数的定义,如下:
function createCompiler(baseOptions) {
  function compile() {}
  return {
    compile,
    compileToFunctions: createCompileToFunctionFn(compile)
  };
}
2
3
4
5
6
7
在createCompiler函数的内部定义了一个子函数compile,同时返回一个对象,其中这个对象的第二个属性就是我们在开头看到的compileToFunctions,其值对应的是createCompileToFunctionFn(compile)函数的返回值,那么我们再往前推,看看createCompileToFunctionFn(compile)函数又是怎么样的。
createCompileToFunctionFn(compile)函数的出处位于源码的src/complier/to-function.js文件中,如下:
export function createCompileToFunctionFn(compile) {
  return function compileToFunctions() {
    // compile
    const res = {};
    const compiled = compile(template, options);
    res.render = createFunction(compiled.render, fnGenErrors);
    res.staticRenderFns = compiled.staticRenderFns.map(code => {
      return createFunction(code, fnGenErrors);
    });
    return res;
  };
}

function createFunction(code, errors) {
  try {
    return new Function(code);
  } catch (err) {
    errors.push({ err, code });
    return noop;
  }
}
2
3
4
5
6
7
8
9
10
11
12
13
14
15
16
17
18
19
20
21
可以看到,调用createCompileToFunctionFn函数就可以得到compileToFunctions函数了,终于推到头了,原来最开始调用compileToFunctions函数是在这里定义的,那么我们就来看一下compileToFunctions函数内部都干了些什么。
compileToFunctions函数内部会调用传入的compile函数,而这个compile函数是createCompiler函数内部定义的子函数,如下:
function compile(template, options) {
  const compiled = baseCompile(template, finalOptions);
  compiled.errors = errors;
  compiled.tips = tips;
  return compiled;
}
2
3
4
5
6
在compile函数内部又会调用传入的baseCompile函数,而这个baseCompile函数就是我们所说的模板编译三大阶段的主线函数,如下:
function baseCompile (
  template: string,
  options: CompilerOptions
): CompiledResult {
  // 模板解析阶段:用正则等方式解析 template 模板中的指令、class、style等数据,形成AST
  const ast = parse(template.trim(), options)
  if (options.optimize !== false) {
    // 优化阶段:遍历AST,找出其中的静态节点,并打上标记;
    optimize(ast, options)
  }
  // 代码生成阶段:将AST转换成渲染函数;
  const code = generate(ast, options)
  return {
    ast,
    render: code.render,
    staticRenderFns: code.staticRenderFns
  }
2
3
4
5
6
7
8
9
10
11
12
13
14
15
16
17
18
那么现在就清晰了,最开始调用的compileToFunctions函数内部调用了compile函数,在compile函数内部又调用了baseCompile函数,而baseCompile函数返回的是代码生成阶段生成好的render函数字符串。所以在compileToFunctions函数内部调用compile函数就可以拿到生成好的render函数字符串,然后在compileToFunctions函数内部将render函数字符串传给createFunction函数从而变成真正的render函数返回出去,最后将其赋值给options.render。为了便于更好的理解,我们画出了其上述过程的流程图,如下:
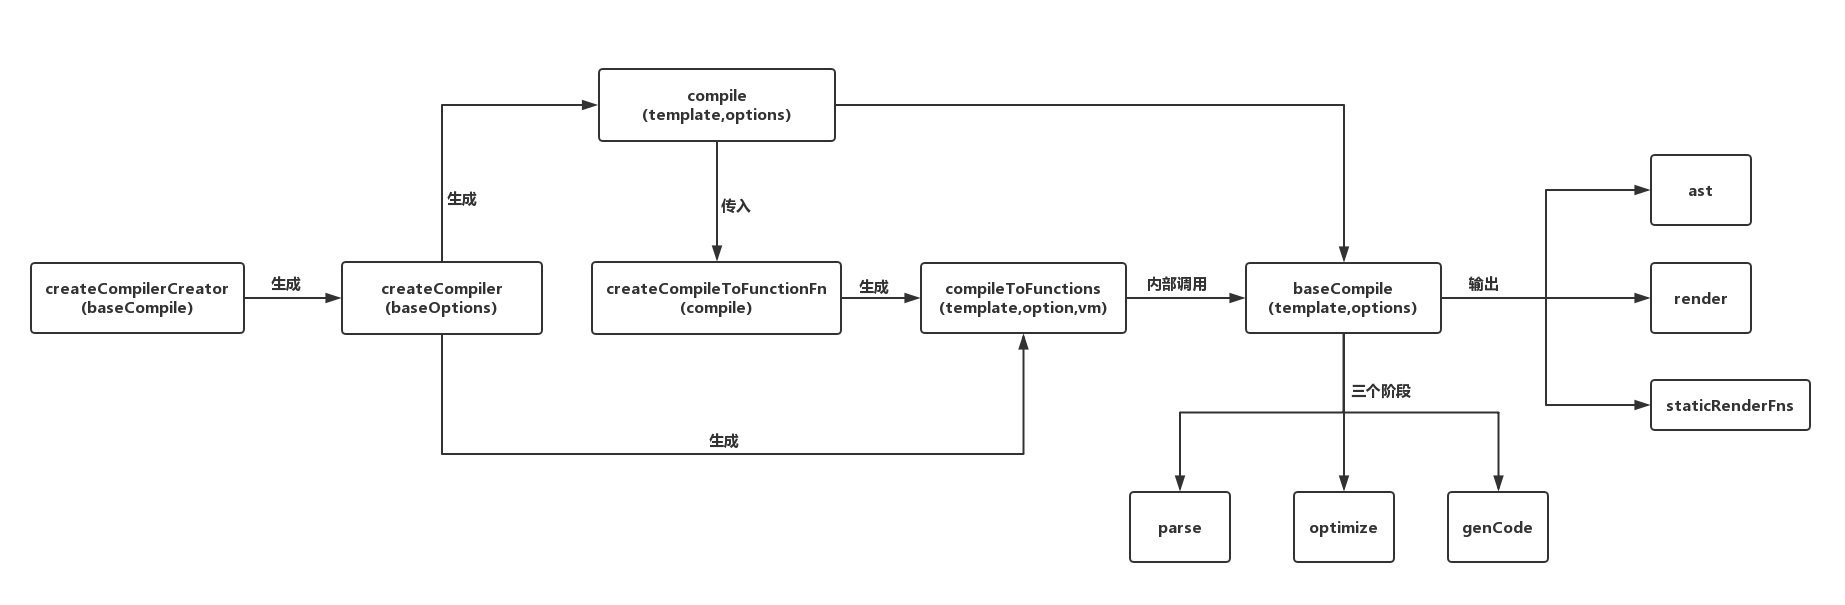
以上,就是模板编译的整体流程。
# 3. 整体导图
