# 1. 前言
在之前的文章中,不管是get请求还是post请求都已经可以正常发出了,并且在浏览器的F12中也都能正确的看到返回的数据了,但这仅仅是在浏览器中利用开发者工具看到返回的数据,而在代码中我们还是无法拿到返回的数据,我们期望的使用方式应该是如下样子的:
axios({
  method: 'post',
  url: '/api/getResponse',
  data: {
    a: 1,
    b: 2
  }
}).then((res) => {
  console.log(res)
})
2
3
4
5
6
7
8
9
10
我们期望能够拿到服务端响应的数据,并且支持 Promise 链式调用的方式。
# 2. 响应数据接口定义
我们先来分析下,我们都想要拿到服务端给我们响应哪些数据:首先最主要的服务端返回的数据data不能少,其次,例如HTTP 状态码status,状态消息 statusText,响应头 headers、请求配置对象 config 以及请求的 XMLHttpRequest 对象实例 request,这些信息我们也都想拿到,基于此,我们先在src/types/index.ts中定义一下服务端响应的数据接口类型AxiosResponse,如下:
export interface AxiosResponse {
  data: any; // 服务端返回的数据
  status: number; // HTTP 状态码
  statusText: string; // 状态消息
  headers: any; // 响应头
  config: AxiosRequestConfig; // 请求配置对象
  request: any; // 请求的 XMLHttpRequest 对象实例
}
2
3
4
5
6
7
8
另外,我们还期望axios 函数能够返回一个 Promise 对象,以满足我们想要的链式调用,那么我们可以定义一个 AxiosPromise 接口,它继承于 Promise<AxiosResponse> 这个泛型接口:
export interface AxiosPromise extends Promise<AxiosResponse> {
}
2
这样的话,当 axios 返回的是 AxiosPromise 类型,那么 resolve 函数中的参数就是一个 AxiosResponse 类型。
对于一个 AJAX 请求的响应,我们在发送请求的时候还可以通过设置 XMLHttpRequest对象的responseType属性来指定它响应数据的类型responseType (responseType的MDN介绍) (opens new window),于是,我们可以给之前定义好的 AxiosRequestConfig 类型添加一个可选属性responseType,添加后如下:
export interface AxiosRequestConfig {
  url: string;
  method?: Method;
  headers?: any;
  data?: any;
  params?: any;
  responseType?: XMLHttpRequestResponseType;
}
2
3
4
5
6
7
8
responseType 的类型是一个 XMLHttpRequestResponseType 类型,它的定义是 "" | "arraybuffer" | "blob" | "document" | "json" | "text" 字符串字面量类型。
# 3. 获取响应
定义好响应数据的接口类型后,我们就可以来写获取响应的逻辑了。我们知道,一个完整的AJAX流程大致分为4步:
创建XMLHttpRequest异步对象;
配置请求参数;
发送请求;
注册事件,获取响应数据
之前在src/xhr.ts中我们已经完成了前3步,那么接下来我们就实现第4步:
import { AxiosPromise, AxiosRequestConfig, AxiosResponse } from "./types";

export default function xhr(config: AxiosRequestConfig): AxiosPromise {
  return new Promise((resolve, reject) => {
    const { data = null, url, method = "get", headers, responseType } = config;

    // 1.创建XMLHttpRequest异步对象
    const request = new XMLHttpRequest();
    // 2.配置请求参数
    request.open(method.toUpperCase(), url, true);

    Object.keys(headers).forEach(name => {
      if (data === null && name.toLowerCase() === "content-type") {
        delete headers[name];
      }
      request.setRequestHeader(name, headers[name]);
    });

    if (responseType) {
      request.responseType = responseType;
    }

    // 3.发送请求
    request.send(data);
    // 4.注册事件,拿到响应信息
    request.onreadystatechange = function handleLoad() {
      if (request.readyState !== 4) {
        return;
      }
      const responseHeaders = request.getAllResponseHeaders();
      const responseData =
        responseType && responseType !== "text"
          ? request.response
          : request.responseText;
      const response: AxiosResponse = {
        data: responseData,
        status: request.status,
        statusText: request.statusText,
        headers: responseHeaders,
        config,
        request
      };
      resolve(response);
    };
  });
}
2
3
4
5
6
7
8
9
10
11
12
13
14
15
16
17
18
19
20
21
22
23
24
25
26
27
28
29
30
31
32
33
34
35
36
37
38
39
40
41
42
43
44
45
46
47
48
这里,我们还判断了如果 config 中配置了 responseType,我们要把它设置到 request.responseType 中。
另外,当 responseType没有设置或者设置为text时,响应数据存在于request.responseText,其余情况,响应数据存在于request.response,所以我们添加了这行代码:
const responseData = responseType && responseType !== "text"? request.response: request.responseText;
最后,在 onreadystatechange 事件函数中,我们构造了 AxiosResponse 类型的 reponse 对象,并把它 resolve 出去。
修改了 xhr 函数,我们同样也要对应修改 axios 函数:
// src/index.ts

function axios(config: AxiosRequestConfig): AxiosPromise {
  processConfig(config)
  return xhr(config)
}
2
3
4
5
6
7
OK,获取响应就已经完成了,接下来,我们就可以编写demo来测试下效果怎么样。
# 4. 编写demo
在 examples 目录下创建 getResponse目录,在 getResponse目录下创建 index.html:
<!DOCTYPE html>
<html lang="en">
  <head>
    <meta charset="UTF-8" />
    <title>getResponse demo</title>
  </head>
  <body>
    <script src="/__build__/getResponse.js"></script>
  </body>
</html>
2
3
4
5
6
7
8
9
10
11
接着再创建 app.ts 作为入口文件:
import axios from "../../src/index";

axios({
  method: "post",
  url: "/api/getResponse",
  data: {
    a: 1,
    b: 2
  }
}).then(res => {
  console.log(res);
});

axios({
  method: "post",
  url: "/api/getResponse",
  responseType: "json",
  data: {
    a: 3,
    b: 4
  }
}).then(res => {
  console.log(res);
});
2
3
4
5
6
7
8
9
10
11
12
13
14
15
16
17
18
19
20
21
22
23
24
接着在 server/server.js 添加新的接口路由:
router.post("/api/getResponse", function(req, res) {
  res.json(req.body);
});
2
3
最后在根目录下的index.html中加上启动该demo的入口:
<li><a href="examples/getResponse">getResponse</a></li>
OK,我们在命令行中执行:
# 同时开启客户端和服务端
npm run server | npm start
2
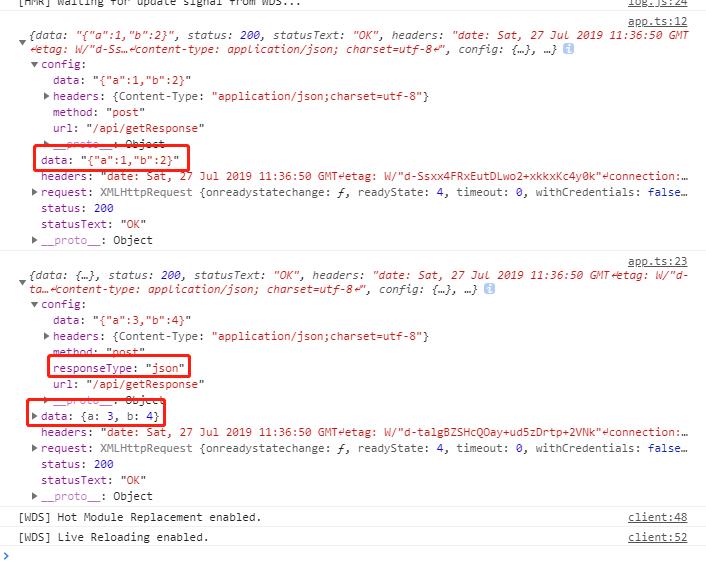
接着我们打开 chrome 浏览器,访问 http://localhost:8000/ (opens new window) 即可访问我们的 demo 了,我们点击 getResponse,通过F12的控制台我们可以看到:两条请求的响应信息都已经被打印出来了,并且第一条请求我们没有指定responseType属性,它默认为text,打印出来的data数据就是字符串类型,而第二条请求我们指定了responseType: "json",打印出来的data数据就是json类型的。
# 5. 遗留问题
从上图中我们还看到,打印出来的headers变成了字符串类型,并不是我们之前设置的对象类型,而且如果返回的data是一个json字符串,我们还应该给它转换成对象类型的。那么后面我们就来做这两件事情。